Panorama Images - The Capture
This is my process for capturing panorama images. I don’t mean just taking one image and then cropping it to a panoramic aspect ratio. This is fine in itself if you set out to take the image with that aspect ratio in mind (eg 16 x 9). The process I am describing here is where the shot needs to be very wide ( eg 3 x 1, or even 4 x 1) and is best accommodated by taking a number of shots in parallel and stitching them together in software afterwards.
From the outset, the more care you take in setting up the shot, the better the chance of the image turning out as you would hope. Stitching software can do some fantastic work, but don’t expect it to make up for poor practice at the point of capture. The more you can deal 'in camera' with issues like levelling, distortion and mis-matching (see parallax below) the better.
The example shot(s) I will be using presented some challenges in terms of set-up, composition and processing, but there was no need for specialist panoramic equipment designed to eliminate parallax problems. Briefly parallax error occurs when an object appears to move when viewed from two slightly different points. As a quick example, if you hold your finger about six inches from your nose and look at it through either eye alternatively, your finger will appear to move relative to the background. This is the parallax effect and can be a problem for stitching photos together where the camera (or more correctly the lens) is not being rotated through its correct axis (the no-parallax point). This is more of an issue where there are close foreground subjects and can be sorted with the use of specialist equipment such as a panoramic head or panning base or nodal slide. These will not however be the subject of these notes as I am concentrating on producing images where all items in the scene are relatively far away and there is little likelyhood of parallax issues arising.
Here is the final image :-
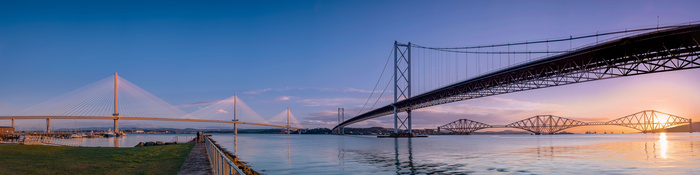
The images needed to produce this image were taken at dawn on a fine spring morning and they capture the three bridges crossing the River Forth near Edinburgh in Scotland. In essence the shots were taken looking north over the river, but in actuality the span of the panorama was close to 180 degrees. My aim was to capture an ultra-wide view of the three bridges, with as complete and well-separated a view of each bridge as possible.
Planning
Not every subject you photograph will lend itself to a panoramic aspect ratio. For this shot I deliberately set out to capture the result you see, having used Google Maps and The Photographer's Ephemeris to find the best time and location. Don't be tempted to shoot a pano just because you can! Each area of the vista must add to the viewer's experience. If your main subject is strong and there is no added benefit of going wide - then don't!
Better a strong image with a good central subject, than one where the impact of that subject is MEH! at best because of weak extremities.
Composition
Once you have decided on your content for the image, satisfy yourself on the composition. Where will the pano start, where will it end, how narrow or deep do you want it to be, do you have an overall aspect ratio you want to stick to (eg 4 x 1)? Compositional rules such as the rule of thirds are unlikely to be useful, but don't dismiss them without some consideration. Balance is important. It is easier to get this wrong with an ultra wide shot. Don't have one side loaded with subject matter and the other bland and uninteresting. When you are happy with your intended composition, take a few test shots (possibly with your 'phone) to give an impression of how the final image might turn out.
Exposure
Be mindful of differences in exposure over the width of the panorama, especially for dawn or dusk shots. Consider determining the average exposure and using this across the whole set of captures. All exposures MUST have the same settings (don't let the camera decide any of these). So shutter speed, aperture, ISO and white balance should be set manually and fixed for the range of shots taken. If the dynamic range appears to be too wide for one setting, consider exposure bracketing. This may solve the problem of lost detail in shadows or blown-out highlights, but will add a significant amount of extra work to the post processing.
Shot Technique
Tripod - using a tripod is much more likely to result in images which will stitch together easily. Firstly, level the tripod itself. Most have a bubble level just below the head and getting a good level at this point will guarantee an overall level across the range of individual shots. Move on to levelling the tripod head and camera. Again, the head will probably have a bubble level and the camera will have a levelling aid. Even better if your camera allows you to adjust pitch, roll and yaw. If you do not get these right, you might start off with what you think is a level setup and end up with a significant tilt as you pan around.
Capturing the Images
Before you start to shoot, ensure that your focal length is sufficiently wide to allow for some level of cropping. No matter how level your set up is, you are likely to need or at least want to crop the image when stitched together to arrive at the desired overall composition. This is even more important where you want to produce an image with a specific aspect ratio (eg 4 to 1).
It is normal practice to shoot in portrait mode. This means that more shots are required, but it will result in a higher resolution final image.
Through trial and error you should find what works for you in terms of the amount of overlap between shots. You will get a feel for this in post production - too little overlap will make stitching difficult, too much means stitching more images than you need to. Get to know what works best for the stitching software you are using and stick to that.
I would suggest a minimum overlap of 25% and, for most situations, 33% is probably best.
If you work from left to right, pick a spot two thirds of the way across the image and use that as the left-hand edge for your second shot. Apply this technique across all the remaining images.
Work quickly and smoothly. This is important where the vista can change because of light variations, cloud movements etc.
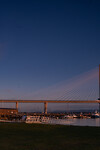
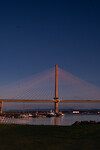
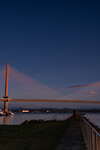
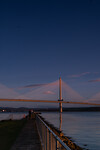
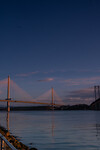
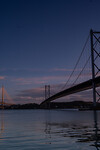
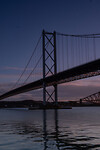
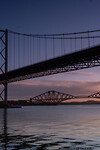
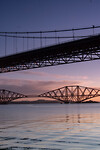
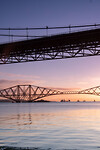
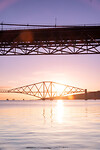
Below are 12 shots needed to create the panorama. Because of the amount of dynamic range in the vista, I actually applied a 3-shot exposure bracketing, giving a total of 36 images taken, but I have only provided 12 here to demonstrate what was needed.

Aside from exposure bracketing (or maybe focus stacking), you may want to take more than one shot at each position, depending on your view on moving subjects. Better having options to choose from when stitching the images together than be tied to single shots which are less than ideal.
Consider repeating the whole process, again to give you options in post production.
You should now be ready to stitch the images together. This will be the subject of a separate set of notes.
From the outset, the more care you take in setting up the shot, the better the chance of the image turning out as you would hope. Stitching software can do some fantastic work, but don’t expect it to make up for poor practice at the point of capture. The more you can deal 'in camera' with issues like levelling, distortion and mis-matching (see parallax below) the better.
The example shot(s) I will be using presented some challenges in terms of set-up, composition and processing, but there was no need for specialist panoramic equipment designed to eliminate parallax problems. Briefly parallax error occurs when an object appears to move when viewed from two slightly different points. As a quick example, if you hold your finger about six inches from your nose and look at it through either eye alternatively, your finger will appear to move relative to the background. This is the parallax effect and can be a problem for stitching photos together where the camera (or more correctly the lens) is not being rotated through its correct axis (the no-parallax point). This is more of an issue where there are close foreground subjects and can be sorted with the use of specialist equipment such as a panoramic head or panning base or nodal slide. These will not however be the subject of these notes as I am concentrating on producing images where all items in the scene are relatively far away and there is little likelyhood of parallax issues arising.
Here is the final image :-
The images needed to produce this image were taken at dawn on a fine spring morning and they capture the three bridges crossing the River Forth near Edinburgh in Scotland. In essence the shots were taken looking north over the river, but in actuality the span of the panorama was close to 180 degrees. My aim was to capture an ultra-wide view of the three bridges, with as complete and well-separated a view of each bridge as possible.
Planning
Not every subject you photograph will lend itself to a panoramic aspect ratio. For this shot I deliberately set out to capture the result you see, having used Google Maps and The Photographer's Ephemeris to find the best time and location. Don't be tempted to shoot a pano just because you can! Each area of the vista must add to the viewer's experience. If your main subject is strong and there is no added benefit of going wide - then don't!
Better a strong image with a good central subject, than one where the impact of that subject is MEH! at best because of weak extremities.
Composition
Once you have decided on your content for the image, satisfy yourself on the composition. Where will the pano start, where will it end, how narrow or deep do you want it to be, do you have an overall aspect ratio you want to stick to (eg 4 x 1)? Compositional rules such as the rule of thirds are unlikely to be useful, but don't dismiss them without some consideration. Balance is important. It is easier to get this wrong with an ultra wide shot. Don't have one side loaded with subject matter and the other bland and uninteresting. When you are happy with your intended composition, take a few test shots (possibly with your 'phone) to give an impression of how the final image might turn out.
Exposure
Be mindful of differences in exposure over the width of the panorama, especially for dawn or dusk shots. Consider determining the average exposure and using this across the whole set of captures. All exposures MUST have the same settings (don't let the camera decide any of these). So shutter speed, aperture, ISO and white balance should be set manually and fixed for the range of shots taken. If the dynamic range appears to be too wide for one setting, consider exposure bracketing. This may solve the problem of lost detail in shadows or blown-out highlights, but will add a significant amount of extra work to the post processing.
Shot Technique
Tripod - using a tripod is much more likely to result in images which will stitch together easily. Firstly, level the tripod itself. Most have a bubble level just below the head and getting a good level at this point will guarantee an overall level across the range of individual shots. Move on to levelling the tripod head and camera. Again, the head will probably have a bubble level and the camera will have a levelling aid. Even better if your camera allows you to adjust pitch, roll and yaw. If you do not get these right, you might start off with what you think is a level setup and end up with a significant tilt as you pan around.
Capturing the Images
Before you start to shoot, ensure that your focal length is sufficiently wide to allow for some level of cropping. No matter how level your set up is, you are likely to need or at least want to crop the image when stitched together to arrive at the desired overall composition. This is even more important where you want to produce an image with a specific aspect ratio (eg 4 to 1).
It is normal practice to shoot in portrait mode. This means that more shots are required, but it will result in a higher resolution final image.
Through trial and error you should find what works for you in terms of the amount of overlap between shots. You will get a feel for this in post production - too little overlap will make stitching difficult, too much means stitching more images than you need to. Get to know what works best for the stitching software you are using and stick to that.
I would suggest a minimum overlap of 25% and, for most situations, 33% is probably best.
If you work from left to right, pick a spot two thirds of the way across the image and use that as the left-hand edge for your second shot. Apply this technique across all the remaining images.
Work quickly and smoothly. This is important where the vista can change because of light variations, cloud movements etc.
Below are 12 shots needed to create the panorama. Because of the amount of dynamic range in the vista, I actually applied a 3-shot exposure bracketing, giving a total of 36 images taken, but I have only provided 12 here to demonstrate what was needed.
Aside from exposure bracketing (or maybe focus stacking), you may want to take more than one shot at each position, depending on your view on moving subjects. Better having options to choose from when stitching the images together than be tied to single shots which are less than ideal.
Consider repeating the whole process, again to give you options in post production.
You should now be ready to stitch the images together. This will be the subject of a separate set of notes.